No edit summary |
(→Additional Tips: gremmar 'n speling) Tag: Visual edit |
||
| (34 intermediate revisions by 21 users not shown) | |||
| Line 3: | Line 3: | ||
The '''{{PAGENAME}}''', nicknamed the ''Fatboy'', is a [[UEF]] unit. This is an [[experimental unit]], as well as a [[factory]], [[direct fire unit]], [[anti-air unit]], [[defense unit]] and an [[air support unit]]. |
The '''{{PAGENAME}}''', nicknamed the ''Fatboy'', is a [[UEF]] unit. This is an [[experimental unit]], as well as a [[factory]], [[direct fire unit]], [[anti-air unit]], [[defense unit]] and an [[air support unit]]. |
||
| − | + | The Fatboy is considered by some to be the most versatile unit in Supreme Commander, being amphibious, shielded, and equipped with a wide array of weapons including [[Hells Fury Riot Gun]]s, [[Linked Railgun]]s, [[Angler Torpedo]]s, as well as four high powered triple [[Gauss Cannon]]s. When on land and not moving, it can also produce any land vehicle the UEF posesses, enabling the Fatboy to create a land army or an air support squad within minutes. However, it is very slow moving and susceptible to heavy air units and requires support to increase its [[Survivability]] when the enemy has air dominance. Its weaknesses are offset by its long range and high damage output. |
|
| − | The Fatboy is best used as defense against other ground [[Experimental]] units, or as a forward [[firebase]]. |
+ | The Fatboy is best used as defense against other ground [[Experimental]] units, or as a forward [[firebase]]. Its long range (it is only outranged by some sea units, and all the different artillery pieces including the [[Scathis]] and [[Mavor]]) and incredible [[DPS]] makes it very effective when [[kiting]] other Experimentals and smashing defenses. However, the Fatboy is particularly vulnerable to [[Aircraft]], [[Submarine]]s, and any other Experimentals that can get close enough to fire their main weapons. |
| − | It should be noted that the Fatboy has relatively low health for a mobile experimental |
+ | It should be noted that the Fatboy has relatively low health for a mobile experimental which means that it is very reliant on its shields. |
==Tips== |
==Tips== |
||
| − | # The Fatboy is an excellent tool for smashing enemy lines; however, it can also be very useful for setting up [[firebase]]s and building a strike force just outside the enemy base. It cannot build structures for a firebase, but it can build engineers to construct it. It can also rapidly adapt to any new threats by building units to counter the threat. For instance, it can build [[UEF T2 Anti-Air Flak Artillery|T2 anti-air]] in response to an air assault. (If you are up against T3 bombers, you probably will not have any time to do so.) |
+ | # The Fatboy is an excellent tool for smashing enemy lines; however, it can also be very useful for setting up [[firebase]]s and building a strike force just outside the enemy base. It cannot build structures for a firebase, but it can build engineers to construct it. It can also rapidly adapt to any new threats by building units to counter the threat. For instance, it can build [[UEF T2 Anti-Air Flak Artillery|T2 anti-air]] in response to an air assault. (If you are up against T3 bombers, you probably will not have any time to do so.) |
# The Fatboy may initially seem to be poor value compared to other factions' land experimentals, being comparatively expensive and ridiculously fragile compared even to the very cheap Cybran ''[[Monkeylord]]''. However you have to understand that unlike the ''Monkeylord'', ''[[Galactic Colossus]]'', ''[[Ythotha]]'' and ''[[Megalith]]'', the Fatboy is not a direct assault unit. Rather than storming into enemy lines soaking up damage and smashing everything around it, the Fatboy is meant to sit back out of range annihilating anything in reach with its devastating battery of Gauss Cannons. The shield is there to protect the Fatboy from lucky hits, air attacks and tactical missiles. Virtually no non-experimental unit can survive the blizzard of fire a Fatboy can lay down, so victory should be attained by a creeping barrage which slowly forces the enemy's frontline back, rather than a lightning strike which smashes a hole in their lines like other experimentals. |
# The Fatboy may initially seem to be poor value compared to other factions' land experimentals, being comparatively expensive and ridiculously fragile compared even to the very cheap Cybran ''[[Monkeylord]]''. However you have to understand that unlike the ''Monkeylord'', ''[[Galactic Colossus]]'', ''[[Ythotha]]'' and ''[[Megalith]]'', the Fatboy is not a direct assault unit. Rather than storming into enemy lines soaking up damage and smashing everything around it, the Fatboy is meant to sit back out of range annihilating anything in reach with its devastating battery of Gauss Cannons. The shield is there to protect the Fatboy from lucky hits, air attacks and tactical missiles. Virtually no non-experimental unit can survive the blizzard of fire a Fatboy can lay down, so victory should be attained by a creeping barrage which slowly forces the enemy's frontline back, rather than a lightning strike which smashes a hole in their lines like other experimentals. |
||
# The ''Fatboy's'' anti-air weapons are deactivated when underwater, making it especially vulnerable to torpedo bombers. Although the Fatboy is equipped with torpedoes, these are very weak, and you should not count on them. Unless you are hoping for a surprise attack (with low chances of success, due to lack of mobile stealth and low speed), you should never send the Fatboy on a trip underwater without naval and air support. When underwater, even a small squad of T1 submarines or T2 torpedo bombers can easily take it out. If the squad is big enough, then they can even do it before back-up has time to arrive. |
# The ''Fatboy's'' anti-air weapons are deactivated when underwater, making it especially vulnerable to torpedo bombers. Although the Fatboy is equipped with torpedoes, these are very weak, and you should not count on them. Unless you are hoping for a surprise attack (with low chances of success, due to lack of mobile stealth and low speed), you should never send the Fatboy on a trip underwater without naval and air support. When underwater, even a small squad of T1 submarines or T2 torpedo bombers can easily take it out. If the squad is big enough, then they can even do it before back-up has time to arrive. |
||
# When your opponent has Fatboys underwater and you do not have anything to detect submerged units, use aircraft and look for the shimmering top of the shield. In most maps this will be exposed above the water and can also be damaged by any projectile, so remember this if you need to get through its shield when the experimental is underwater. |
# When your opponent has Fatboys underwater and you do not have anything to detect submerged units, use aircraft and look for the shimmering top of the shield. In most maps this will be exposed above the water and can also be damaged by any projectile, so remember this if you need to get through its shield when the experimental is underwater. |
||
| − | # It is very important for the Fatboy to be escorted with anti-air. Due to the Fatboy's direct fire power and range, the preferred strategy for taking |
+ | # It is very important for the Fatboy to be escorted with anti-air. Due to the Fatboy's direct fire power and range, the preferred strategy for taking it out is with aircrafts such as gunships and bombers. Without air defense, the Fatboy can be destroyed in a matter of seconds by a big enough aerial force, including any other flying experimentals. |
# It is always smart to escort the Fatboy with engineers or an [[sACU]] or two, as these can help keep the Fatboy's shields up. It is always better to spend energy to keep the shield from coming down than having to repair the Fatboy, or losing it. |
# It is always smart to escort the Fatboy with engineers or an [[sACU]] or two, as these can help keep the Fatboy's shields up. It is always better to spend energy to keep the shield from coming down than having to repair the Fatboy, or losing it. |
||
# The Fatboy's Ground Weapons are deactivated if it's producing Units. You need to stop production, since pausing has no effect. Remember this if you use the Fatboy as a unit producing base defense. |
# The Fatboy's Ground Weapons are deactivated if it's producing Units. You need to stop production, since pausing has no effect. Remember this if you use the Fatboy as a unit producing base defense. |
||
| − | # Do not waste the production capacity of the Fatboy, as it is three times faster than a T3 Land Factory. If it is not fighting or moving let it produce units. On island maps it can be very useful to produce several [[Percival]]s, |
+ | # Do not waste the production capacity of the Fatboy, as it is three times faster than a T3 Land Factory. If it is not fighting or moving let it produce units. On island maps it can be very useful to produce several [[Percival]]s, since they are amphibious and can support the Fatboy when it surfaces. Especially in those maps, naval defense is extremely necessary due to the non-naval defense of the expensive siege bots. |
| − | # If using the Fatboy's Ground Weapons or any time producing units, remember to face the Fatboy away from the enemy, that way the produced units are between the Fatboy and the approaching threat, allowing a few to be created and engage the enemy to distract and provide valuable time for the Fatboy to escape, or to keep them between the Fatboy and |
+ | # If using the Fatboy's Ground Weapons or any time producing units, remember to face the Fatboy away from the enemy, that way the produced units are between the Fatboy and the approaching threat, allowing a few to be created and engage the enemy to distract and provide valuable time for the Fatboy to escape, or to keep them between the Fatboy and its target. Those seconds can mean the difference between saving and losing the Fatboy, especially for those units that don't out range it, such as the Colossus or Monkeylords. |
| + | # When told to attack a target, normally the Fatboy will turn and face its target, allowing only the two front gauss cannons to fire. Using a move command, however, it is possible to position the Fatboy in an angle in which three of its gauss cannons are able to fire, thus increasing the damage output (up from 1500 DPS to 2250 DPS) of the Fatboy and destroying the target(s) faster. |
||
| ⚫ | |||
| + | # The Fatboy's shield works underwater, allowing it to protect units submerged on the ocean floor, i.e. ACUs, sACUs, Percivals, etc. |
||
| ⚫ | # To sum up all the other tips: Although the Fatboy is very versatile, without full support, it is very vulnerable to a wide range of attacks. If you send out a Fatboy alone, expect its immediate destruction from Gunships, or T1 subs if it is underwater. NEVER send it against a Ythotha, Galactic Colossus, Megalith, or Monkeylord when in direct combat as it would be reduced to rubble in seconds. |
||
| + | |||
| + | == Additional Tips== |
||
| + | 1. Each of the Fatboy's Gauss Cannon can engage different targets at once, thus it is usually best to not issue attack commands with the Fatboy, but rather leave it to its own accord as a single Fatboy can usually engage up to 3 different fronts. |
||
| + | |||
| + | 2. The Fatboy's Riot Guns are very powerful and has very high DPS and rate of fire (it has higher DPS than Monkeylord's bolters), however their range is quite short and they have slow projectiles, thus they're excellent against T3 units that wonder too close to the Fatboy, but can be slow to handle a large army of weaker units. Also, it is usually best to keep Fatboys away from direct combat since even though it has powerful close range weapons, it does not have the HP to withstand too much damage. |
||
| + | |||
| + | 3. A good tactic when using Fatboys offensively is to pair each of them with an sACU, upgraded with shield generator field and enhanced sensors. Since Fatboys do not have onboard radar, the sACU's extended radar can help reveal enemy units, and the 52k shield and sACU's repair capability can greatly extend the Fatboy's lifetime. |
||
| + | |||
| + | '''Using the Fatboy as a Mobile Factory''' |
||
| + | |||
| + | Most players, especially on FAF, use this not as a Mobile Factory, but as more of a mobile artillery, raining down gauss fire on enemy positions. But the Fatboy is also EXTREMELY useful as a base deployment unit. |
||
| + | |||
| + | In 2v2 games, if your team-mate is playing Cybran, grab a Deceiver and a few T2 mobile flak (try to get both Cybran and UEF flak as the UEF guns point backwards and the Cybran forward which means that they fill each others weaknesses out) and move the Fatboy to an opposing corner of the map. Then, start pumping out T3 engineers from the Fatboy and order them to build a Mavor. |
||
| + | |||
| + | This is especially useful if your opponents have too much defence (Ravagers beware!) for the Fatboy to cope. This is also one of the best tactics in the 2nd Forged Alliance mission, where you can micro your Fatboy through the Order base, take control of that little nook, build a Mavor and T3 omni, and start shelling QAI! |
||
| + | |||
| + | This strategy, however, clearly relies on massive amounts of resources and is just a very situational manuever. Simpler and more sensible approaches to the Fatboy's mobile factory capabilities can be devised based on its very adaptative nature, at the player's discretion, such as using it to produce T1 Engineers, which can assist it, repairing the unit and recharging its shield. The Experimental can mass produce them very quickly due to its high build rate and said Engineers can also be repurposed as needed, including to build anti-air defenses, for example. |
||
==Trivia== |
==Trivia== |
||
| − | The Fatboy is a reference to both nuclear bombs used during World War 2, '''Fat''' Man and Little '''Boy''' |
+ | The Fatboy is a reference to both of the nuclear bombs used during World War 2, '''Fat''' Man and Little '''Boy.''' |
| + | |||
| + | =='''Gallery'''== |
||
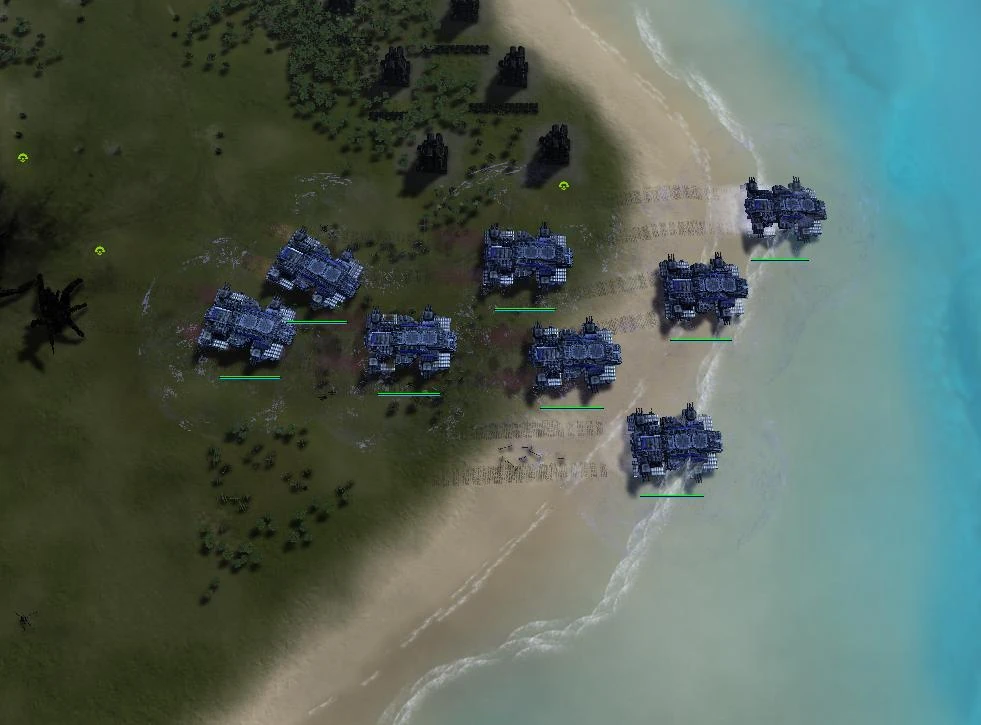
[[File:Fatboys.JPG|thumb|left|334px|Fatboys. Enough said.]] |
[[File:Fatboys.JPG|thumb|left|334px|Fatboys. Enough said.]] |
||
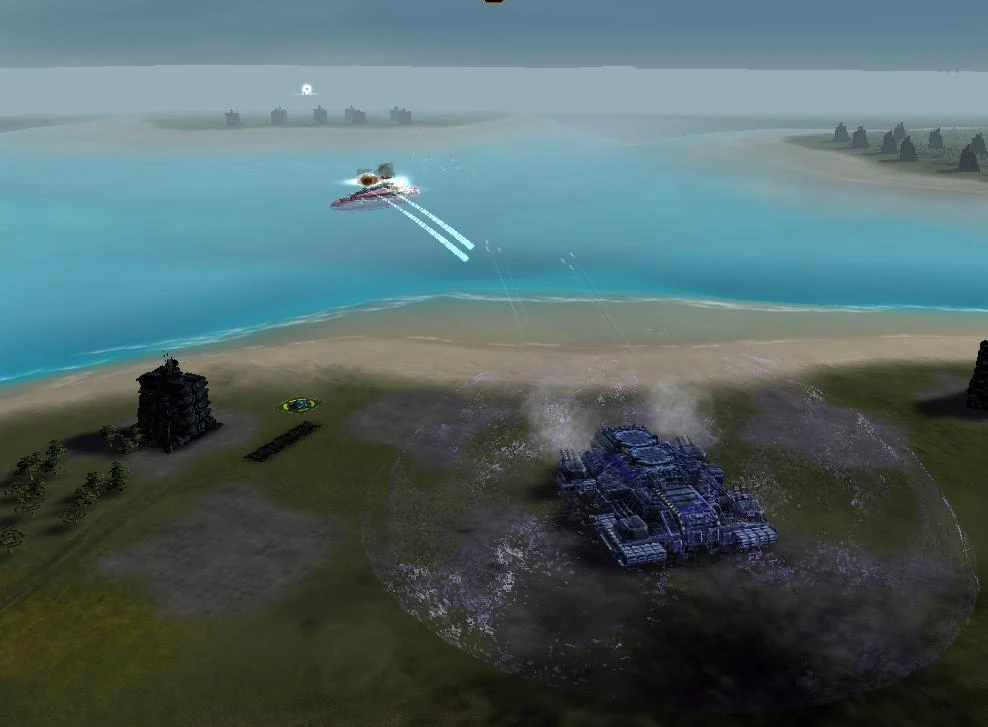
[[File:Fatboy_vs._Omen_Class.JPG|thumb|left|338px|A Fatboy attacking an unfortunate Omen Class]] |
[[File:Fatboy_vs._Omen_Class.JPG|thumb|left|338px|A Fatboy attacking an unfortunate Omen Class]] |
||
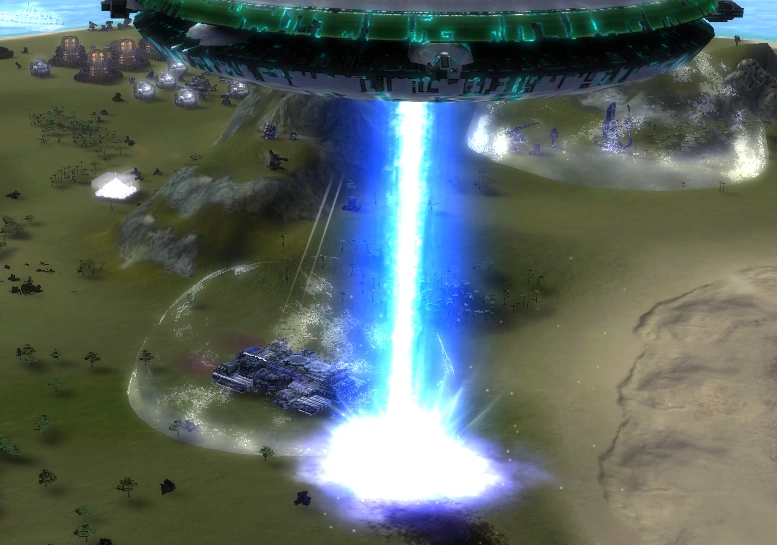
| − | [[Image:CZAR.png|thumb|left|450px|A ''[[CZAR]]'' attacking a [[Fatboy]] with its ''Quantum Beam Generator''.]] |
+ | [[Image:CZAR.png|thumb|left|450px|A ''[[CZAR]]'' attacking a [[Fatboy]] with its ''Quantum Beam Generator''. Goodbye Fatboy.]] |
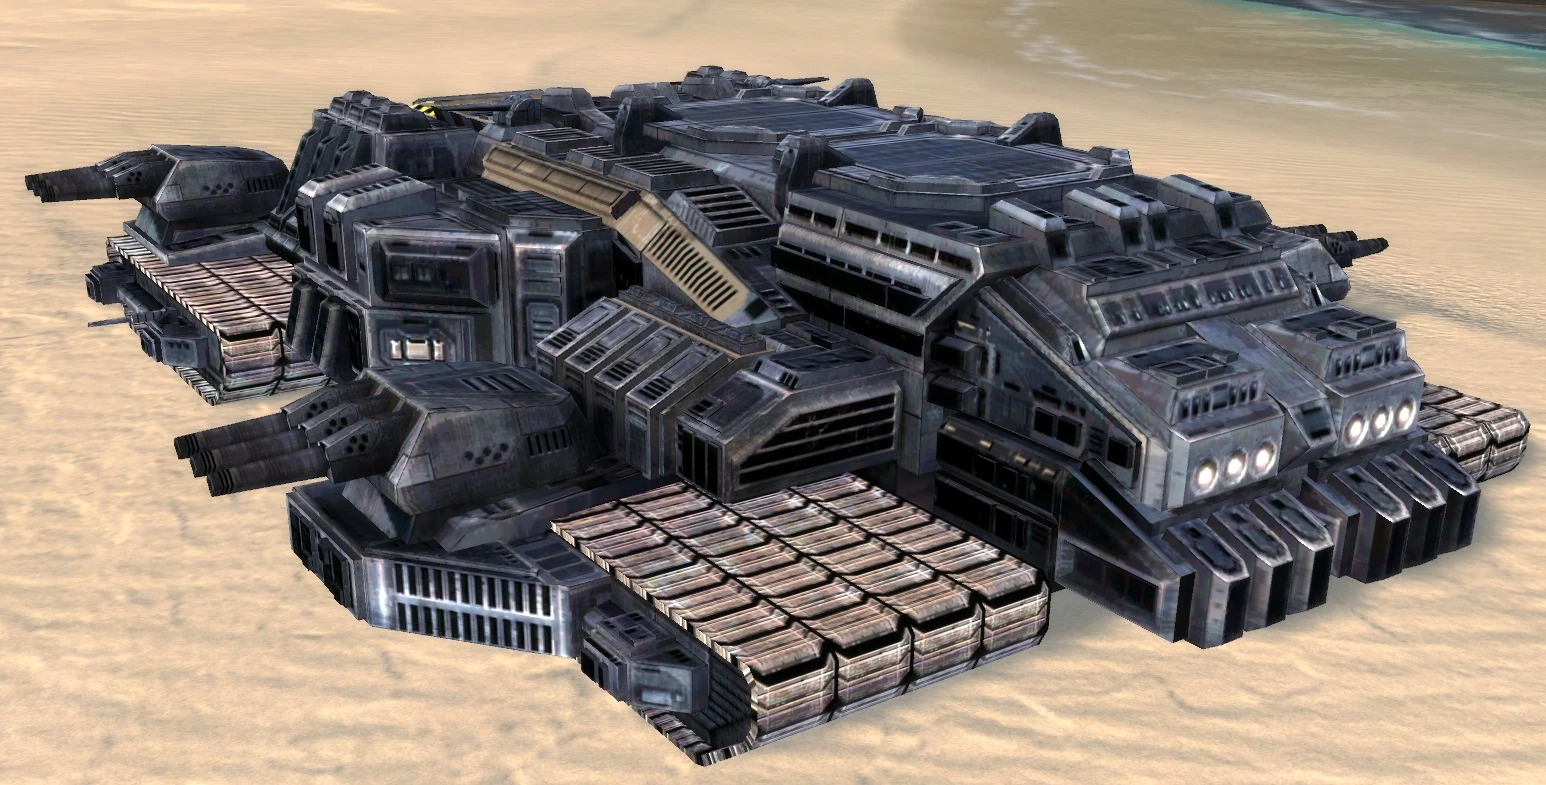
| + | [[File:UEFT4Fatboy.jpg|thumb|left|286px|An idle Fatboy with its shields down]] |
||
[[Category:Experimental units]] |
[[Category:Experimental units]] |
||
[[Category:Production units]] |
[[Category:Production units]] |
||
| Line 35: | Line 57: | ||
[[Category:Air support units]] |
[[Category:Air support units]] |
||
[[Category:UEF units]] |
[[Category:UEF units]] |
||
| + | [[Category:Amphibious units]] |
||
Revision as of 18:47, 26 December 2017
| Experimental Units | ||||
|---|---|---|---|---|
| Direct Fire | ||||
| Naval | ||||
| Air | ||||
| Indirect Fire | ||||
| Other | ||||
 | |
| Build costs | |
|---|---|
| Storage | |
| Consumption | |
| Build rate |
|
| Max health | |
| Shield health | |
| Shield rebuild | |
| Shield radius | 25 |
| Speed | 1.75 (Amphibious) |
| Veterancy |
|
| Intel (radius) | Vision: 32 Water vision: 32 |
Weapon: Gauss Cannon x 4 Direct Fire - Projectile |
|
| Damage per second | 750 |
| Projectile damage | 250 |
| Damage radius | 1.5 |
| Salvo size | 3 Projectiles |
| Reload time | 1 seconds |
| Range | 100 |
Weapon: Hells Fury Riot Gun x 2 Direct Fire - Projectile |
|
| Damage per second | 450 |
| Projectile damage | 150 |
| Rate of fire | 3 Projectiles/s |
| Range | 45 |
Weapon: Linked Railgun x 2 Anti Air - Projectile |
|
| Damage per second | 60 |
| Projectile damage | 20 |
| Salvo size | 2 Projectiles |
| Rate of fire | 1.5 salvos/s |
| Range | 45 |
Weapon: Angler Torpedo Anti Navy - Torpedo |
|
| Damage per second | 75 |
| Torpedo damage | 75 |
| Salvo size | 4 Torpedos |
| Reload time | 4 seconds |
| Range | 40 |
Weapon: Death weapon |
|
| Damage | 4000 |
| Damage radius | 7 |
The UEF Experimental Mobile Factory, nicknamed the Fatboy, is a UEF unit. This is an experimental unit, as well as a factory, direct fire unit, anti-air unit, defense unit and an air support unit.
The Fatboy is considered by some to be the most versatile unit in Supreme Commander, being amphibious, shielded, and equipped with a wide array of weapons including Hells Fury Riot Guns, Linked Railguns, Angler Torpedos, as well as four high powered triple Gauss Cannons. When on land and not moving, it can also produce any land vehicle the UEF posesses, enabling the Fatboy to create a land army or an air support squad within minutes. However, it is very slow moving and susceptible to heavy air units and requires support to increase its Survivability when the enemy has air dominance. Its weaknesses are offset by its long range and high damage output.
The Fatboy is best used as defense against other ground Experimental units, or as a forward firebase. Its long range (it is only outranged by some sea units, and all the different artillery pieces including the Scathis and Mavor) and incredible DPS makes it very effective when kiting other Experimentals and smashing defenses. However, the Fatboy is particularly vulnerable to Aircraft, Submarines, and any other Experimentals that can get close enough to fire their main weapons.
It should be noted that the Fatboy has relatively low health for a mobile experimental which means that it is very reliant on its shields.
Tips
- The Fatboy is an excellent tool for smashing enemy lines; however, it can also be very useful for setting up firebases and building a strike force just outside the enemy base. It cannot build structures for a firebase, but it can build engineers to construct it. It can also rapidly adapt to any new threats by building units to counter the threat. For instance, it can build T2 anti-air in response to an air assault. (If you are up against T3 bombers, you probably will not have any time to do so.)
- The Fatboy may initially seem to be poor value compared to other factions' land experimentals, being comparatively expensive and ridiculously fragile compared even to the very cheap Cybran Monkeylord. However you have to understand that unlike the Monkeylord, Galactic Colossus, Ythotha and Megalith, the Fatboy is not a direct assault unit. Rather than storming into enemy lines soaking up damage and smashing everything around it, the Fatboy is meant to sit back out of range annihilating anything in reach with its devastating battery of Gauss Cannons. The shield is there to protect the Fatboy from lucky hits, air attacks and tactical missiles. Virtually no non-experimental unit can survive the blizzard of fire a Fatboy can lay down, so victory should be attained by a creeping barrage which slowly forces the enemy's frontline back, rather than a lightning strike which smashes a hole in their lines like other experimentals.
- The Fatboy's anti-air weapons are deactivated when underwater, making it especially vulnerable to torpedo bombers. Although the Fatboy is equipped with torpedoes, these are very weak, and you should not count on them. Unless you are hoping for a surprise attack (with low chances of success, due to lack of mobile stealth and low speed), you should never send the Fatboy on a trip underwater without naval and air support. When underwater, even a small squad of T1 submarines or T2 torpedo bombers can easily take it out. If the squad is big enough, then they can even do it before back-up has time to arrive.
- When your opponent has Fatboys underwater and you do not have anything to detect submerged units, use aircraft and look for the shimmering top of the shield. In most maps this will be exposed above the water and can also be damaged by any projectile, so remember this if you need to get through its shield when the experimental is underwater.
- It is very important for the Fatboy to be escorted with anti-air. Due to the Fatboy's direct fire power and range, the preferred strategy for taking it out is with aircrafts such as gunships and bombers. Without air defense, the Fatboy can be destroyed in a matter of seconds by a big enough aerial force, including any other flying experimentals.
- It is always smart to escort the Fatboy with engineers or an sACU or two, as these can help keep the Fatboy's shields up. It is always better to spend energy to keep the shield from coming down than having to repair the Fatboy, or losing it.
- The Fatboy's Ground Weapons are deactivated if it's producing Units. You need to stop production, since pausing has no effect. Remember this if you use the Fatboy as a unit producing base defense.
- Do not waste the production capacity of the Fatboy, as it is three times faster than a T3 Land Factory. If it is not fighting or moving let it produce units. On island maps it can be very useful to produce several Percivals, since they are amphibious and can support the Fatboy when it surfaces. Especially in those maps, naval defense is extremely necessary due to the non-naval defense of the expensive siege bots.
- If using the Fatboy's Ground Weapons or any time producing units, remember to face the Fatboy away from the enemy, that way the produced units are between the Fatboy and the approaching threat, allowing a few to be created and engage the enemy to distract and provide valuable time for the Fatboy to escape, or to keep them between the Fatboy and its target. Those seconds can mean the difference between saving and losing the Fatboy, especially for those units that don't out range it, such as the Colossus or Monkeylords.
- When told to attack a target, normally the Fatboy will turn and face its target, allowing only the two front gauss cannons to fire. Using a move command, however, it is possible to position the Fatboy in an angle in which three of its gauss cannons are able to fire, thus increasing the damage output (up from 1500 DPS to 2250 DPS) of the Fatboy and destroying the target(s) faster.
- The Fatboy's shield works underwater, allowing it to protect units submerged on the ocean floor, i.e. ACUs, sACUs, Percivals, etc.
- To sum up all the other tips: Although the Fatboy is very versatile, without full support, it is very vulnerable to a wide range of attacks. If you send out a Fatboy alone, expect its immediate destruction from Gunships, or T1 subs if it is underwater. NEVER send it against a Ythotha, Galactic Colossus, Megalith, or Monkeylord when in direct combat as it would be reduced to rubble in seconds.
Additional Tips
1. Each of the Fatboy's Gauss Cannon can engage different targets at once, thus it is usually best to not issue attack commands with the Fatboy, but rather leave it to its own accord as a single Fatboy can usually engage up to 3 different fronts.
2. The Fatboy's Riot Guns are very powerful and has very high DPS and rate of fire (it has higher DPS than Monkeylord's bolters), however their range is quite short and they have slow projectiles, thus they're excellent against T3 units that wonder too close to the Fatboy, but can be slow to handle a large army of weaker units. Also, it is usually best to keep Fatboys away from direct combat since even though it has powerful close range weapons, it does not have the HP to withstand too much damage.
3. A good tactic when using Fatboys offensively is to pair each of them with an sACU, upgraded with shield generator field and enhanced sensors. Since Fatboys do not have onboard radar, the sACU's extended radar can help reveal enemy units, and the 52k shield and sACU's repair capability can greatly extend the Fatboy's lifetime.
Using the Fatboy as a Mobile Factory
Most players, especially on FAF, use this not as a Mobile Factory, but as more of a mobile artillery, raining down gauss fire on enemy positions. But the Fatboy is also EXTREMELY useful as a base deployment unit.
In 2v2 games, if your team-mate is playing Cybran, grab a Deceiver and a few T2 mobile flak (try to get both Cybran and UEF flak as the UEF guns point backwards and the Cybran forward which means that they fill each others weaknesses out) and move the Fatboy to an opposing corner of the map. Then, start pumping out T3 engineers from the Fatboy and order them to build a Mavor.
This is especially useful if your opponents have too much defence (Ravagers beware!) for the Fatboy to cope. This is also one of the best tactics in the 2nd Forged Alliance mission, where you can micro your Fatboy through the Order base, take control of that little nook, build a Mavor and T3 omni, and start shelling QAI!
This strategy, however, clearly relies on massive amounts of resources and is just a very situational manuever. Simpler and more sensible approaches to the Fatboy's mobile factory capabilities can be devised based on its very adaptative nature, at the player's discretion, such as using it to produce T1 Engineers, which can assist it, repairing the unit and recharging its shield. The Experimental can mass produce them very quickly due to its high build rate and said Engineers can also be repurposed as needed, including to build anti-air defenses, for example.
Trivia
The Fatboy is a reference to both of the nuclear bombs used during World War 2, Fat Man and Little Boy.
Gallery

Fatboys. Enough said.

A Fatboy attacking an unfortunate Omen Class

A CZAR attacking a Fatboy with its Quantum Beam Generator. Goodbye Fatboy.

An idle Fatboy with its shields down