m (Undo revision 29816 by 68.51.164.16 (talk)) |
(Added change: Describing 'Land' Units not being able to be killed by Mavor Shell) |
||
| Line 7: | Line 7: | ||
The ''Mavor'' is the only strategic artillery piece available, as it is capable of firing at any ground target on the map due to its almost unlimited [[Range]]. This, of course, excludes any target within its large minimum range. The ''Mavor'' shells are very accurate and powerful, and also have a very large [[damage radius]]. Because of this, the ''Mavor'' can destroy any building in one to two shells. Any shields protecting the building will be quickly dealt with. Further, thanks to the large damage radius, the ''Mavor'' can efficiently break through any shield patch. |
The ''Mavor'' is the only strategic artillery piece available, as it is capable of firing at any ground target on the map due to its almost unlimited [[Range]]. This, of course, excludes any target within its large minimum range. The ''Mavor'' shells are very accurate and powerful, and also have a very large [[damage radius]]. Because of this, the ''Mavor'' can destroy any building in one to two shells. Any shields protecting the building will be quickly dealt with. Further, thanks to the large damage radius, the ''Mavor'' can efficiently break through any shield patch. |
||
| − | Because of the shell's high air time, the ''Mavor'' is inefficient against mobile units. However, any non-experimental unit hit by a ''Mavor'' shell will be immediately destroyed. Experimental units will receive massive damage, and the ''Mavor'' can sometimes also hit flying experimental units, with a little luck. |
+ | Because of the shell's high air time, the ''Mavor'' is inefficient against mobile units. However, any non-experimental land unit hit by a ''Mavor'' shell will be immediately destroyed. Experimental units will receive massive damage, and the ''Mavor'' can sometimes also hit flying experimental units, with a little luck. |
== Use == |
== Use == |
||
Revision as of 21:37, 23 July 2009
| Experimental Units | ||||
|---|---|---|---|---|
| Direct Fire | ||||
| Naval | ||||
| Air | ||||
| Indirect Fire | ||||
| Other | ||||
| Artillery installations | ||||
|---|---|---|---|---|
| Tech 2 Artillery Installation | ||||
| Tech 3 Heavy Artillery Installation | ||||
| Experimental Artillery Installation | ||||
 | |
| Build costs | |
|---|---|
| Max health | |
| Veterancy |
|
| Intel (radius) | Vision: 28 |
Weapon: Anti Matter Artillery Artillery - Projectile |
|
| Damage per second | 1500 |
| Projectile damage | 12000 |
| Damage radius | 7 |
| Energy required | |
| Reload time | 8 seconds |
| Range (min–max) | 150 – 4000 |
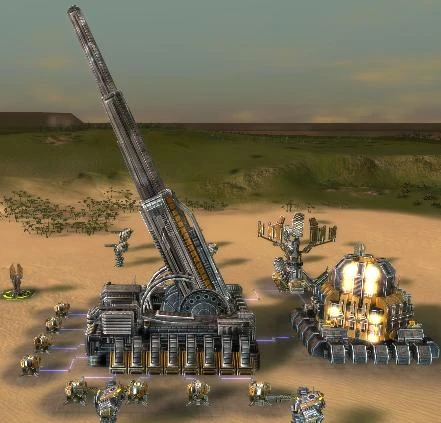
The UEF Mavor : Experimental Artillery is a gigantic experimental artillery piece that uses Anti Matter Artillery to bombard any target anywhere on the map with a high degree of accuracy and deadly efficiency. It is one of the most expensive units in the game, but once built, it is essentially a game ender
Description
The Mavor is the only strategic artillery piece available, as it is capable of firing at any ground target on the map due to its almost unlimited Range. This, of course, excludes any target within its large minimum range. The Mavor shells are very accurate and powerful, and also have a very large damage radius. Because of this, the Mavor can destroy any building in one to two shells. Any shields protecting the building will be quickly dealt with. Further, thanks to the large damage radius, the Mavor can efficiently break through any shield patch.
Because of the shell's high air time, the Mavor is inefficient against mobile units. However, any non-experimental land unit hit by a Mavor shell will be immediately destroyed. Experimental units will receive massive damage, and the Mavor can sometimes also hit flying experimental units, with a little luck.
Use
As a game ender unit, once built, the Mavor can destroy any building on the Map. To get the most efficient use out of a Mavor, destroy only the most deadly buildings: the other game enders, and eventually strategic missile launchers. Anything else is a waste of the units capabilities. Once these threats are gone, tell the Mavor to destroy the opponent's ACU. This can create several scenarios:
- The ACU doesn't move: It takes the Mavor shell and is destroyed: You win.
- The ACU moves around while staying in its base: You annihilate the base. Victory will come soon.
- The ACU flees the base: Take it out with strategic bombers, or others: You win.
In the single player campaign of Forged Alliance, the Mavor can be very helpful for breaking stalemates, especially in the last mission. A few Mavors can destroy the Seraphim Quantum Arch without you even realizing it if you don't give them alternative fire orders. This is only possible due to the low intelligence of the computer AI, however, and you should not expect a human opponent to ignore your Mavor once it starts firing in a real game.
Reminder
Every second you don't destroy the opposing ACU, you are giving your opponent a chance for a sneaky win or tie. When the opponent sees you have a Mavor he will probably react with an all-or nothing attack. Don't give your opponent the chance to pull it off. Don't play around, and win the game. If you don't, you might regret it.
Building
The Mavor has the longest build time of any other unit in the original game (a single T3 Engineer would require over six hours to build it), as well as the highest resource cost in the game (over 300,000 mass, however it has since been supplanted as the Aeon's "Paragon" has an even longer build time and is even costlier) meaning the player must have a very advanced economy running to try build the Mavor without having the entire base paralyzed by lack of resources. However, if and when finished, the Mavor is essentially a game-ending unit, making it well worth the price.
Trivia
The Mavor is named after the Lead Engineer of the game, Jon Mavor.
A UEF Mavor prepares to fire at an enemy base