(Added strategic notes.) |
No edit summary |
||
| (14 intermediate revisions by 8 users not shown) | |||
| Line 1: | Line 1: | ||
| − | {{stub}} |
||
{{Mapbox |
{{Mapbox |
||
| MapCode = SCMP_009 |
| MapCode = SCMP_009 |
||
| Line 16: | Line 15: | ||
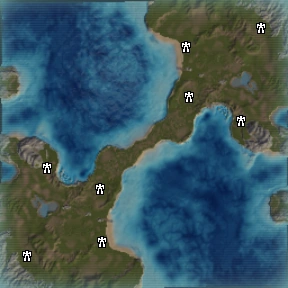
Seton's Clutch is the most popular 4v4 map in the game, although it is also regularly used for 3v3 matches with both teams' front or back position locked out. |
Seton's Clutch is the most popular 4v4 map in the game, although it is also regularly used for 3v3 matches with both teams' front or back position locked out. |
||
| − | Although there are a number of alternate strategies, the pivotal factor in deciding battles on Seton's Clutch is the clash on the land bridge in the center. A large number of high-mass hulks are scattered there at the start of the battle and access to them gives the controlling player a large advantage. T1 spam is the most common and effective strategy here, but the [[Command unit|commander]] is usually sent forward to reclaim the mass personally and often to build point |
+ | Although there are a number of alternate [[strategy|strategies]], the pivotal factor in deciding battles on Seton's Clutch is the clash on the land bridge in the center. A large number of high-mass hulks are scattered there at the start of the battle and access to them gives the controlling player a large advantage. T1 spam is the most common and effective strategy here, but the [[Command unit|commander]] is usually sent forward to [[reclaim]] the [[mass]] personally and often to build [[point defense]]s, resulting in an early confrontation between opposing commanders. The front position is the most important and subsequently the most stressful position on the team, and players have been know to leave a game before it begins when no other positions are available. The midsection of the map is perfect for the [[You shall not pass defensive line turtle stratagy|YOU SHALL NOT PASS stratagy]] |
| − | The 2 players on either flank are free to choose any strategy they like. Because of their positions, naval forces can be developed or disregarded as they please; however keep in mind that on this map naval forces are highly effective at attacking the center and bombarding the bases of the flank players. The large expanses of open ground behind each player's starting position need to be monitored carefully as they're prime positions for an unexpected air drop assault. A regular point of opposition between these players on either side are the 2 small, elevated islands on the sides of the map; with 5 mass |
+ | The 2 players on either flank are free to choose any [[strategy]] they like. Because of their positions, naval forces can be developed or disregarded as they please; however keep in mind that on this map naval forces are highly effective at attacking the center and bombarding the bases of the flank players. The large expanses of open ground behind each player's starting position need to be monitored carefully as they're prime positions for an unexpected air drop assault. A regular point of opposition between these players on either side are the 2 small, elevated islands on the sides of the map; with 5 [[mass deposit]]s on each, these are extremely valuable. Because of their elevation, you must either fly an [[engineer]] in with a [[transport]] (and preferably some defense units) or send an engineer right up to the edge of the island and build a [[factory]] onto it from the water. Although their position definitely favours the left flank players, their opposite number on the enemy's right flank can still capture it and use it as a staging ground to assault the enemy. |
| − | The players at the rear of either team are generally tasked with air support, although the flank players also regularly provide this. They can either produce air units as they tech up, or rush to T3 and begin spamming |
+ | The players at the rear of either team are generally tasked with air support, although the flank players also regularly provide this. They can either produce air units as they tech up, or rush to T3 and begin spamming [[ASF]]s. However, by building a number of forward [[factory|land factories]], the rear player can also provide highly effective land support to the front player. |
Because of the unique starting locations of each team, teamwork is paramount to achieve victory on Seton's Clutch. |
Because of the unique starting locations of each team, teamwork is paramount to achieve victory on Seton's Clutch. |
||
| + | ==Strategy tips== |
||
| + | ===Factional & research recommendations for players relative to positions=== |
||
| + | The front player, who has to deal with most of the straightforward land & air warfare on the bridge plus artillery bombardment of the enemy bases, should be Cybran (Hoplite MRL, Rhino Heavy Tank, Fire Beetle Mobile Bomb, Loyalist Assault Bot, Brick Assault Bot, Trebuchet Artillery, Monkeylord Spiderbot; Zeus Bomber, Gemini ASF, Wailer Gunship, Soul Ripper Gunship; Disruptor Heavy Artillery, Scathis Strategic Artillery). Research-wise, they should get T3 and Experimental land units as soon as possible, then focus on artillery and strategic weapons. |
||
| + | The side players, who handle naval conflict, should be 1 UEF (Summit Class Battleship, Neptune Class Battlecruiser,Bulwark Class Shield Boat, Atlantis aircraft carrier; Ambassador Strategic Bomber, Broadsword Gunship, Continental Transport for ghetto gunshipping; Klink Hammer Artillery, Novax Satellite System) and 1 Aeon (Omen Class Battleship, Torrent Class Missile Ship, Keefer Class Carrier, Tempest Battleship; Mercy Guided Missile, Solace Torpedo Bomber, Restorer Gunship, CZAR Aerial Carrier; Serpentine Missile Launcher, Salvation Rapid Artillery). The UEF player can also help the front player with land combat through reinforcemants and artillery/air support (Mongoose Gatling Bot, Pillar Heavy Tank, Titan Assault Bot, Percival Assault Bot, Demolisher Mobile Artillery, Spearhead MML, Fatboy mobile Factory; Wasp ASF, Ambassador Strategic Bomber, Stinger Gunship; Duke Heavy Artillery, Mavor Strategic Artillery, Novax Satellite System). Research should initially be poured into all tech levels of navy (for offense) and artillery stuctures (for defense and support), then immediately switch to air. |
||
| − | == Official Description == |
||
| + | The rear player, who deals with air support for the others, occasional land support for player 1, and strategic warfare, should be Seraphim (Vish Transport to get land support around quickly, Notha Fighter/Bomber, Vulthoo Gunship, Laselen Spy Plane, Sinntha Strategic Bomber, Ahwassa Heavy Tactical Bomber; Ythisah MML, Usha-Ah Sniper Bot, Othuum Siege Tank, Ythotha Assault Bot; Hovatham Artillery, Hastue Strategic Missile Launcher, Yolona Oss Strategic Missile Launcher). Research should go into T2 air, Artillery and Nukes, FAST, before focussing on T1&3 air later. If it really becomes necessary, spam SCUs and air transports, then fly the SCUs into enemy bases and have them kamikaze and wreck everything. Use your commander in a suicide attack against an enemy ACU in the most dire straights. |
||
| − | ''Dozens of battles have been fought over the years across Seton's Clutch. A patient searcher could find the remains of thousands of units resting beneath the earth and under the waves.'' |
||
| + | |||
| + | ===Turtling=== |
||
| + | All four players should come together in an easily defensible spot, then spam masses of mutually supporting defences (Point Defence, AA, shields, anti-missile, short-range artillery, tactical missiles, patrolling fighters and gunships) before getting a number of nuclear launchers working in the center. Hold off the enemy until you have as many nukes as possible, then launch them in four huge salvos at the enemy bases. It really helps to have a Seraphim player due to having access to the Yolona Oss- cheaper, faster-building, more powerful nukes. Missile subs can get in relatively close and launch close-range nukes to have the enemy waste a few of their anti-nukes prior to the main attack. |
||
| + | |||
| + | ===Experimental land rush=== |
||
| + | Basically spam Fatboys/Monkeylords/Galactic Collosi/Ythothas until you overwhelm the enemy commander. Mods that add new Experimental land units are very helpful here. |
||
Revision as of 21:46, 2 April 2014
| Seton's Clutch Supreme Commander official skirmish map | |
| Max Players | 8 |
| Size | 20x20 km |
| Dozens of battles have been fought over the years across Seton's Clutch. A patient searcher could find the remains of thousands of units resting beneath the earth and under the waves. | |
Seton's Clutch is an official map. It is the setting of the Supreme Commander trailer and the movie in the background of the main menu.
Seton's Clutch is the most popular 4v4 map in the game, although it is also regularly used for 3v3 matches with both teams' front or back position locked out.
Although there are a number of alternate strategies, the pivotal factor in deciding battles on Seton's Clutch is the clash on the land bridge in the center. A large number of high-mass hulks are scattered there at the start of the battle and access to them gives the controlling player a large advantage. T1 spam is the most common and effective strategy here, but the commander is usually sent forward to reclaim the mass personally and often to build point defenses, resulting in an early confrontation between opposing commanders. The front position is the most important and subsequently the most stressful position on the team, and players have been know to leave a game before it begins when no other positions are available. The midsection of the map is perfect for the YOU SHALL NOT PASS stratagy
The 2 players on either flank are free to choose any strategy they like. Because of their positions, naval forces can be developed or disregarded as they please; however keep in mind that on this map naval forces are highly effective at attacking the center and bombarding the bases of the flank players. The large expanses of open ground behind each player's starting position need to be monitored carefully as they're prime positions for an unexpected air drop assault. A regular point of opposition between these players on either side are the 2 small, elevated islands on the sides of the map; with 5 mass deposits on each, these are extremely valuable. Because of their elevation, you must either fly an engineer in with a transport (and preferably some defense units) or send an engineer right up to the edge of the island and build a factory onto it from the water. Although their position definitely favours the left flank players, their opposite number on the enemy's right flank can still capture it and use it as a staging ground to assault the enemy.
The players at the rear of either team are generally tasked with air support, although the flank players also regularly provide this. They can either produce air units as they tech up, or rush to T3 and begin spamming ASFs. However, by building a number of forward land factories, the rear player can also provide highly effective land support to the front player.
Because of the unique starting locations of each team, teamwork is paramount to achieve victory on Seton's Clutch.
Strategy tips
Factional & research recommendations for players relative to positions
The front player, who has to deal with most of the straightforward land & air warfare on the bridge plus artillery bombardment of the enemy bases, should be Cybran (Hoplite MRL, Rhino Heavy Tank, Fire Beetle Mobile Bomb, Loyalist Assault Bot, Brick Assault Bot, Trebuchet Artillery, Monkeylord Spiderbot; Zeus Bomber, Gemini ASF, Wailer Gunship, Soul Ripper Gunship; Disruptor Heavy Artillery, Scathis Strategic Artillery). Research-wise, they should get T3 and Experimental land units as soon as possible, then focus on artillery and strategic weapons.
The side players, who handle naval conflict, should be 1 UEF (Summit Class Battleship, Neptune Class Battlecruiser,Bulwark Class Shield Boat, Atlantis aircraft carrier; Ambassador Strategic Bomber, Broadsword Gunship, Continental Transport for ghetto gunshipping; Klink Hammer Artillery, Novax Satellite System) and 1 Aeon (Omen Class Battleship, Torrent Class Missile Ship, Keefer Class Carrier, Tempest Battleship; Mercy Guided Missile, Solace Torpedo Bomber, Restorer Gunship, CZAR Aerial Carrier; Serpentine Missile Launcher, Salvation Rapid Artillery). The UEF player can also help the front player with land combat through reinforcemants and artillery/air support (Mongoose Gatling Bot, Pillar Heavy Tank, Titan Assault Bot, Percival Assault Bot, Demolisher Mobile Artillery, Spearhead MML, Fatboy mobile Factory; Wasp ASF, Ambassador Strategic Bomber, Stinger Gunship; Duke Heavy Artillery, Mavor Strategic Artillery, Novax Satellite System). Research should initially be poured into all tech levels of navy (for offense) and artillery stuctures (for defense and support), then immediately switch to air.
The rear player, who deals with air support for the others, occasional land support for player 1, and strategic warfare, should be Seraphim (Vish Transport to get land support around quickly, Notha Fighter/Bomber, Vulthoo Gunship, Laselen Spy Plane, Sinntha Strategic Bomber, Ahwassa Heavy Tactical Bomber; Ythisah MML, Usha-Ah Sniper Bot, Othuum Siege Tank, Ythotha Assault Bot; Hovatham Artillery, Hastue Strategic Missile Launcher, Yolona Oss Strategic Missile Launcher). Research should go into T2 air, Artillery and Nukes, FAST, before focussing on T1&3 air later. If it really becomes necessary, spam SCUs and air transports, then fly the SCUs into enemy bases and have them kamikaze and wreck everything. Use your commander in a suicide attack against an enemy ACU in the most dire straights.
Turtling
All four players should come together in an easily defensible spot, then spam masses of mutually supporting defences (Point Defence, AA, shields, anti-missile, short-range artillery, tactical missiles, patrolling fighters and gunships) before getting a number of nuclear launchers working in the center. Hold off the enemy until you have as many nukes as possible, then launch them in four huge salvos at the enemy bases. It really helps to have a Seraphim player due to having access to the Yolona Oss- cheaper, faster-building, more powerful nukes. Missile subs can get in relatively close and launch close-range nukes to have the enemy waste a few of their anti-nukes prior to the main attack.
Experimental land rush
Basically spam Fatboys/Monkeylords/Galactic Collosi/Ythothas until you overwhelm the enemy commander. Mods that add new Experimental land units are very helpful here.